Blender hillshading and mapnik
How did it start? Well, it actually started a long time ago, maybe a year ago, most probably more. I got myself tumbling down the beautiful rabbit hole of Blender based mapping. The idea is very simple: if you have a DEM, you can build a 3D representation of the terrain and use a renderer to build your map. To me the most striking thing about those maps were not their 3D-ness (which to some it's starting to be tiresome , and I agree), but the shadows. I've been pursuing the best shadow for a while, and this seemed like the perfect fit.
So, like I said, one year ago or so I took "the" Blender relief tutorial and run with it. I got to the point where I could reproduce it with a 1x1, 3600x3600px DEM from mapzen, but when I tried to automate it, I found out that Blender has a python console where it prints out the commands that are equivalent to the actions you make in the UI, but the resulting script was too horrible to my eyes and run out of breath (another of those cases of the perfect being the enemy of the good).
Then a few days ago I read that first link and got some steam build up. In fact, it was two passages in it that lit up the fire:
Most of these use a tool called Blender, an extremely powerful open-source tool for all kinds of 3D modeling and rendering. A few cartographers use other tools, such as Aerialod, or R‘s Rayshader plugin.
R! I can easily automate this!
If we stick to a very zoomed-out map, or if we have a really huge computer running Blender, we could try to do a hillshade for the entire world, and then slice that up for our map tiles. But there’s no way we could do this at a high-enough resolution so you could zoom all the way in, as in the sample tiles above.
Challenge accepted! (Spoiler: I'm not there yet).
I tried Rayshader. I wanna be honest: it's easy, quick, but I didn't like the results. It seemed like no matter how high you put the sun, it always drew very long shadows. So despite its pragmaticism, I left it on a side.
So I picked up what I did in the past and tried to apply it to a map. I re-rendered everything and applied it to my style. The outcome was encouraging:

To start with, I probably did that render with not enough render passes, so the output looks grainy. Second, the material color is too bright, so the height tints are washed out. Still, we can see the big shadow cast over the valley some 3200m below the Mont Blanc/Monte Bianco.
This proved to be a good place to test the method, because of the great difference between the valley and the peak casting the shadow over it, and that lead me to think: are there more extreme places in the world? An easy bet is yes, and the place to look for them was the Himalayas. The Aconcagua could have been a good contender, but the valley at its SE is some 4550m already. Surprisingly, the way I searched for a good place was to use existing maps with the usual hill shade technique, looking for big dark spots, specially those wide in the NW-SE direction. I first found my spot in the Tukuche Peak, that looms some 4350m above the Gandaki River, and then the nearby Dhaulagiri, that's even some 1250m higher, clocking at 8167m. Here's how they look (not the big structure in the upper left, but the bigger grey [8000m+] blob to the East of it; the river snakes in the right all the way down):
I had to add 3 more color bands to my style and reshuffle them because I never rendered any 8k'er before, so the colors were haphazardly concocted for the rendering and are not definitive. At least it lets you behold the grandiosity of that rock jutting through thousands and thousands of meters with very steep sides.
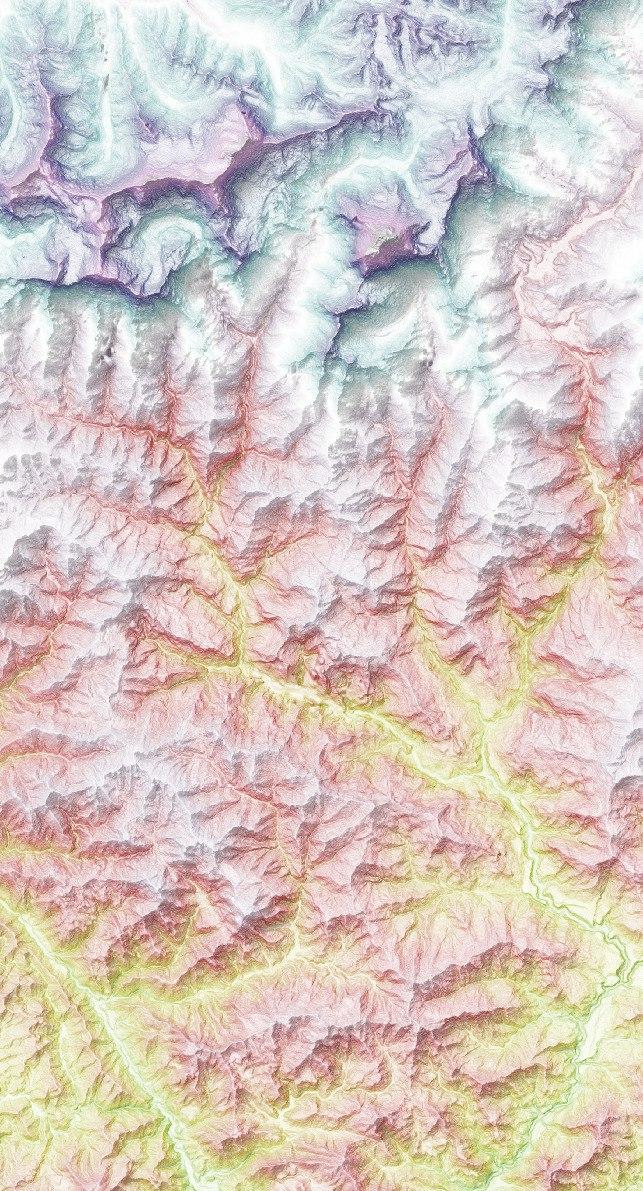
Time to get real. I usually render regions were I'll be going, and next time it's the Upper Segre Valley, so I rendered N42E001-2 in one go. That's 7201x4884px after reprojecting to WebMercator (and compensating as described in the second link!), so some 35Mpx. Blender took some 44m+ on a 4.5yo medium-high spec'ed laptop at 200 render samples, which means that I can continue to render small regions this way, but that for the moment I won't be applying this technique to the whole Europe.
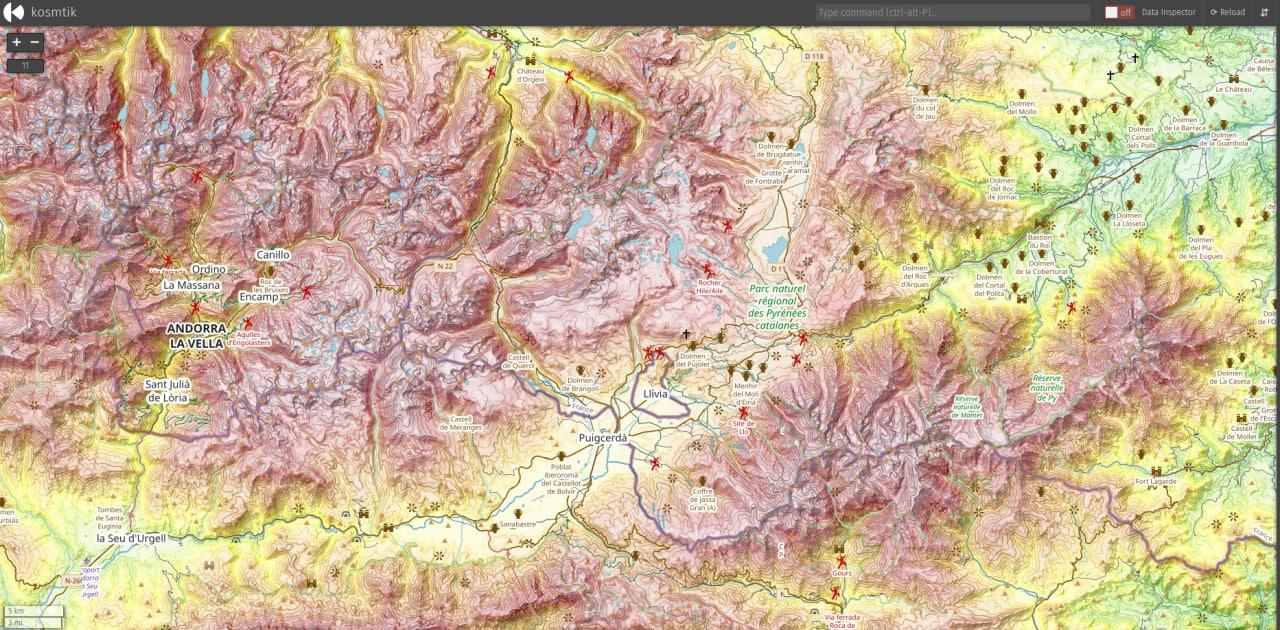
Up to here I was just applying the same style in QGIS, which has been an indispensable tool to develop this
style. But trying these TIFFs in mapnik for the first time needed an extra step. Well, two, in fact. Blender
does not save the TIFFs georeferenced, so you have to copy the data from the original DEM. For that, use
gdal_edit.py -a_srs ... -a_ullr ... with the right ESPG and the data from the output of gdalinfo. Next, for
some reson, it always use 16bits integers, even when explicitly saying to use 8. This little snippet takes care
of that:
import imageio

image = imageio.imread('pirinoak-blender-10x.tif')
image = image / 256
image = image.astype('uint8')
imageio.imwrite('pirinoak-blender-10x-8bits.tif', image)
Thank $DEITY (and developers!) for good libraries.
The first thing I noticed was that we have been lied by maps (again!) for a long time. Most hill shading algos use a 45° high sun (the direction does not matter much). But if you think about it, how many mountains have sides 45°+ steep? According to a (real, not like me!) cartographer friend, for continental Argentina it's less than 1% at 30arcsecs of resolution (note that SRTM is 1arcsec). Still, some shadows are there, and they help us (and we get used to that) to recognize slope direction. And now we're asking a raytracing program to calculate real shadows? The result I initially got was underwhelming, even when I was already asking Blender to exaggerate height by 5x!:
So, I bit the bullet and went all in with 10x:
Much better, but not definitive. I still have to render Dhaulagiri again, and at least some region I already know well by having being there a lot. Here's how that region looks in my style:

Now some notes about "the" Blender relief tutorial. I followed it to the letter, but with my experience I had to make some changes. One you already know, using a displacement scale of 10x instead of 0.3. I have no exact idea why his initial rendering were so spiky, but I suspect that the DEM grid unit was not meters.
Second, since that first Mount Blanc/Monte Bianco render, we know the color is too bright. I lowered it to 0.6
(and later I found that that's what he actually suggests at the end of the plane section) and then compared the
grey in a plain (#b5b5b5) to what GDAL outputs and compensated using a simple coefficient. The final value is
0.402.
Third, I was having issues rendering: I was getting a lot of terracing. After a long chat with Viktor_smg from blender.chat/support they figured out that the sRGB color space in the Image Texture is broken and that I should use XYZ instead. This meant installing Blender by hand instead of relying on the one in Debian Unstable because it's too old and does not have it. They also gave me pointers about how to automate it.
Last, you can't apply this technique DEM by DEM because you want the shadows from the neighbouring tiles to spill over the current one. That link shows how to render the tile and its 8 neighbouring ones, but I think that you can optimize it in two ways: First, since shadows come from the NW, just add the tiles that lie in that general direction. Second, no shadow would cast over 10s of kilometers. You could even get away with just adding a smaller band around the tile.
That's it for now. The next step is to automate this an publish that. $DEITY knows when that will happen.