Filling voids in DEMs
Since I started playing with rendering maps I included some kind of elevation info for highlighting mountains. At the beginning it was just hillshading provided by some german guy (I don't have the reference on me right now), but after reading Tilemill's terrain data guide, I started using DEMs to generate 4 different layers: elevation coloring, slope shading, hillshading and contour lines.
When I started I could find only three DEM sources: SRTM 3arc and ViewFinderPanoramas (1arc and 3arc). The second one tries to flatten plains (for instance, the Po's plain nearby to where I live), where it generates some ugly looking terracing. The third one, when I downloaded the corresponding tile (they're supposed to be 1x1 degrees), its medatada reported an extension between 7 and 48 degrees east, and between 36 and 54 degrees north, and that its size is 147602x64801 pixels. I also remember stitching all the tiles covering Europe, just to get a nice 1x1 degrees hole in the North Adriatic sea. Not having much time to pre or post process the data, I decided to stick to SRTM.
Things changed at the end of last year. The US government decided to release 1arc, 30m global coverage (previously that resolution covered only the US). I started playing with the data mid January, only to find that it is not void-filled: this DEMs are derived from the homonymous Shuttle mission, which used radar to get the data. Radar gets very confused when water is involved; this is no problem on rivers, lakes or sea, where elevation is constant relative to the coast, but it's a problem on snow covered mountains, glaciers and even clouds. This means that the data has NODATA holes. The SRTM 3arc v4.1 I was using had these 'voids' filled; deFerrantis has painstakingly been filling these voids too by hand, using topographic maps as reference.
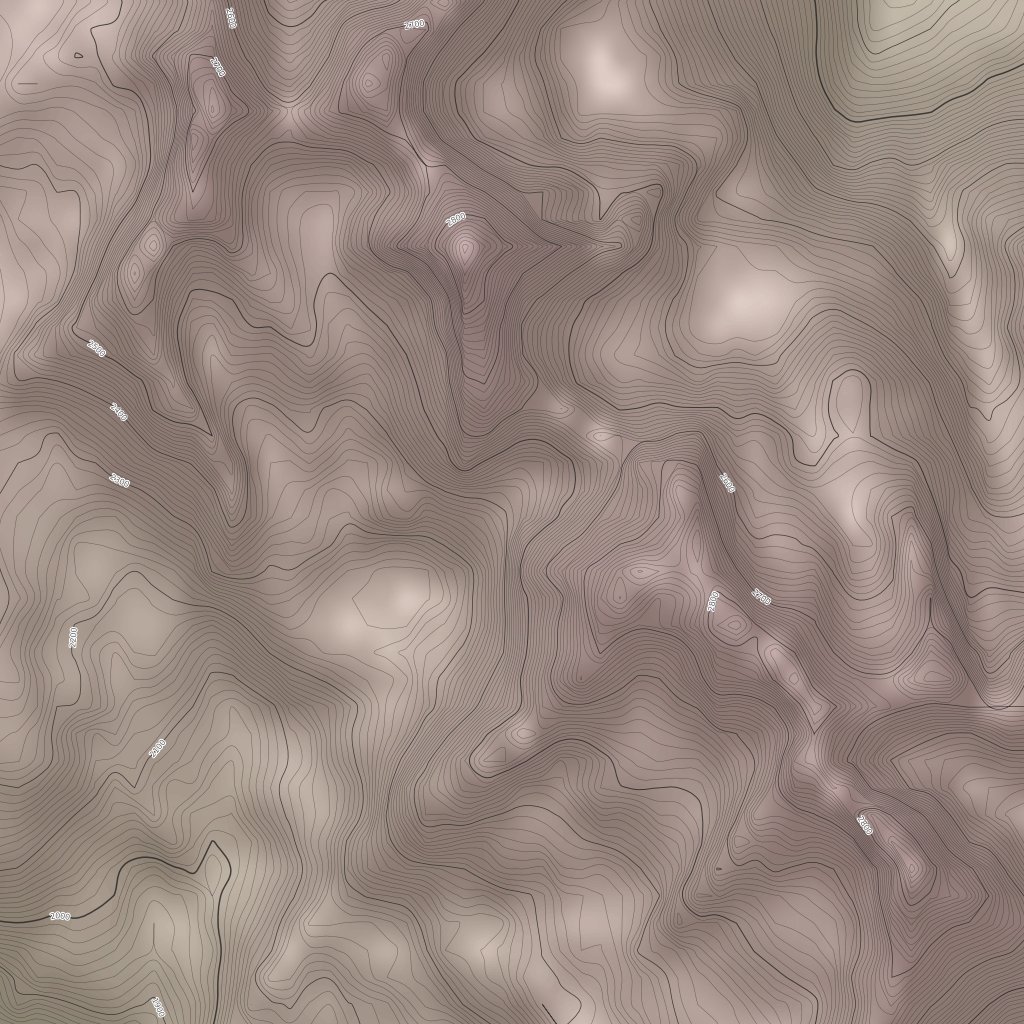
So I set up to fill these voids too. But first let's see how the original data looks like. All the images are for the area near Isola 2000, a ski station I go often. The first image is how this looks on the SRTM 3arc v4.1:
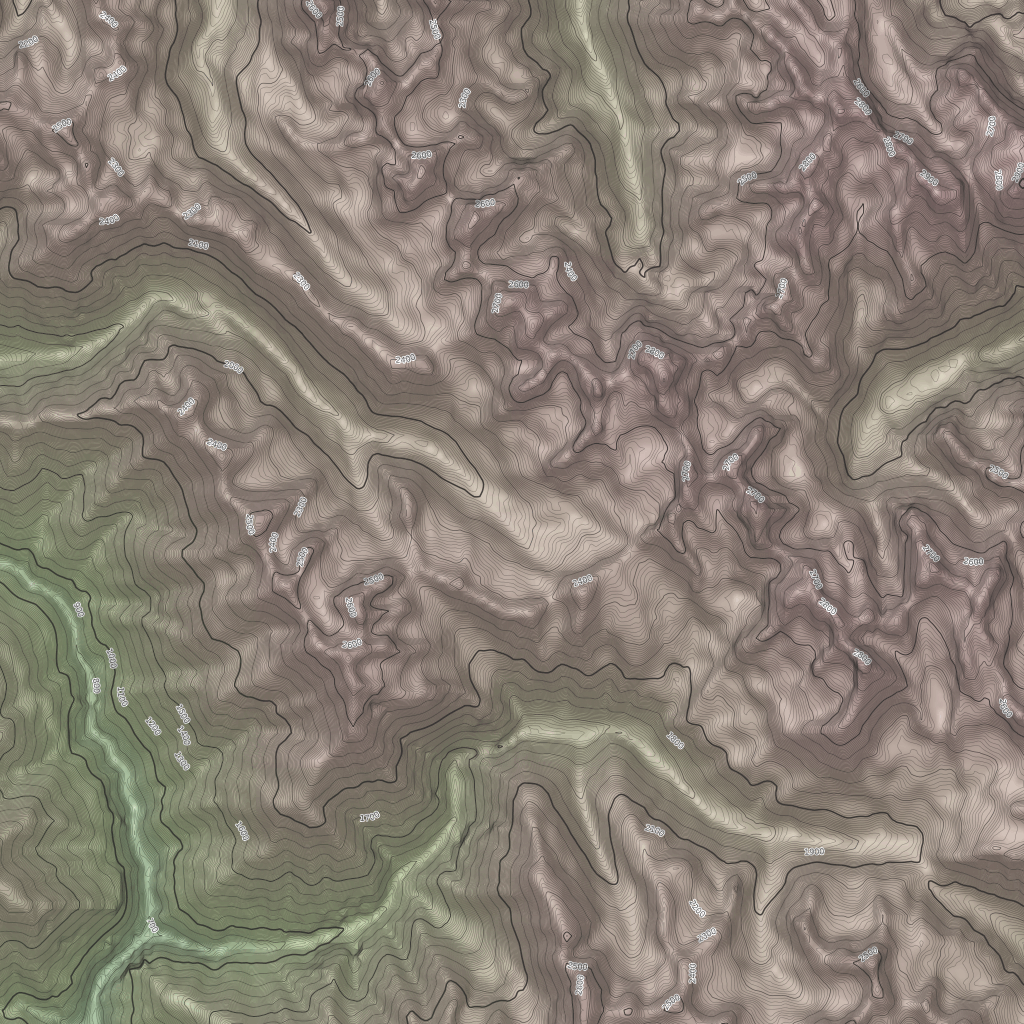
This is a 4x4 grid of 256x256 pixel tiles (1024x1024 in total) at zoom level 13. The heights range from ~700m up to ~2600m, and the image combines all the 4 layers. It already starts showing some roundness in the terrain, specially in ridges and mountain tops; even at the bottom of the deep valleys.
For contrast, this is deFerrantis data:
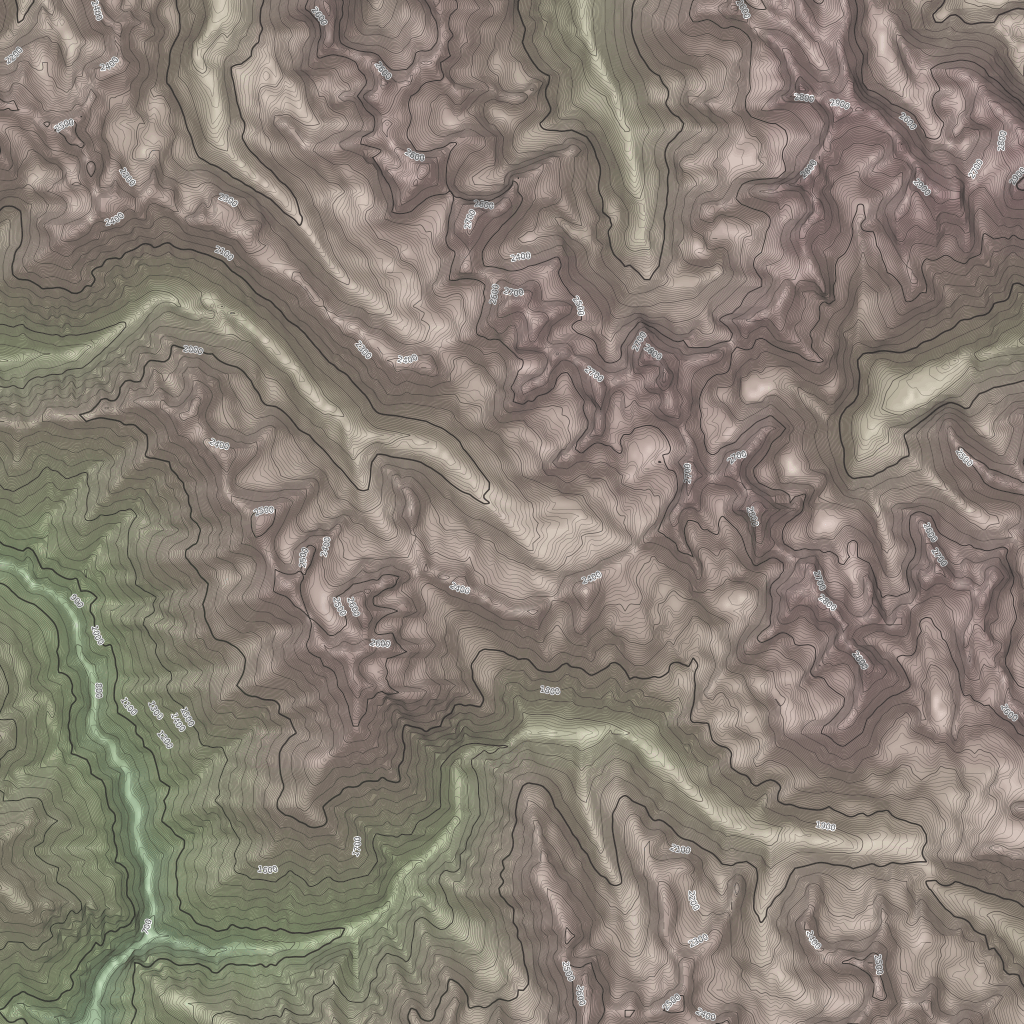
This is the first time I really take a look on the result; it doesn't seem to be much better that 3arc. Here's the terracing I mentioned:
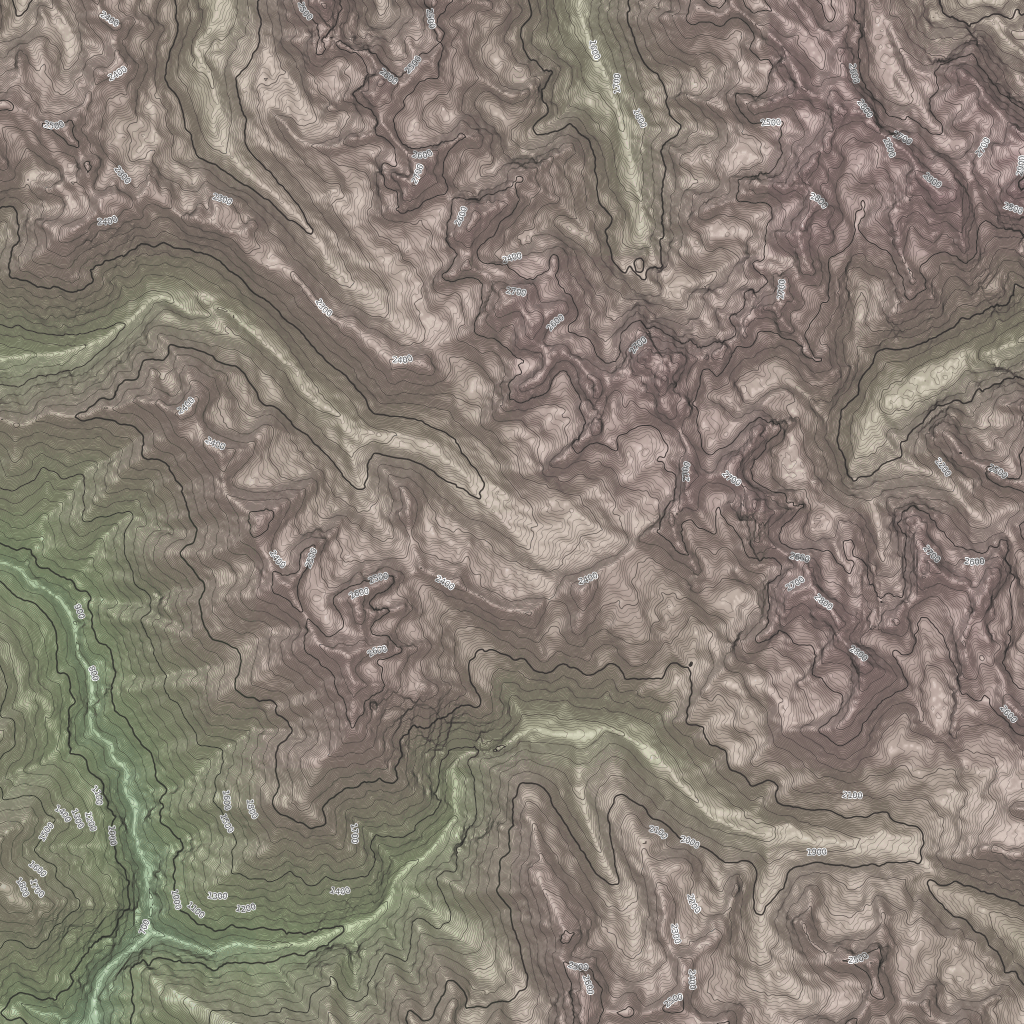
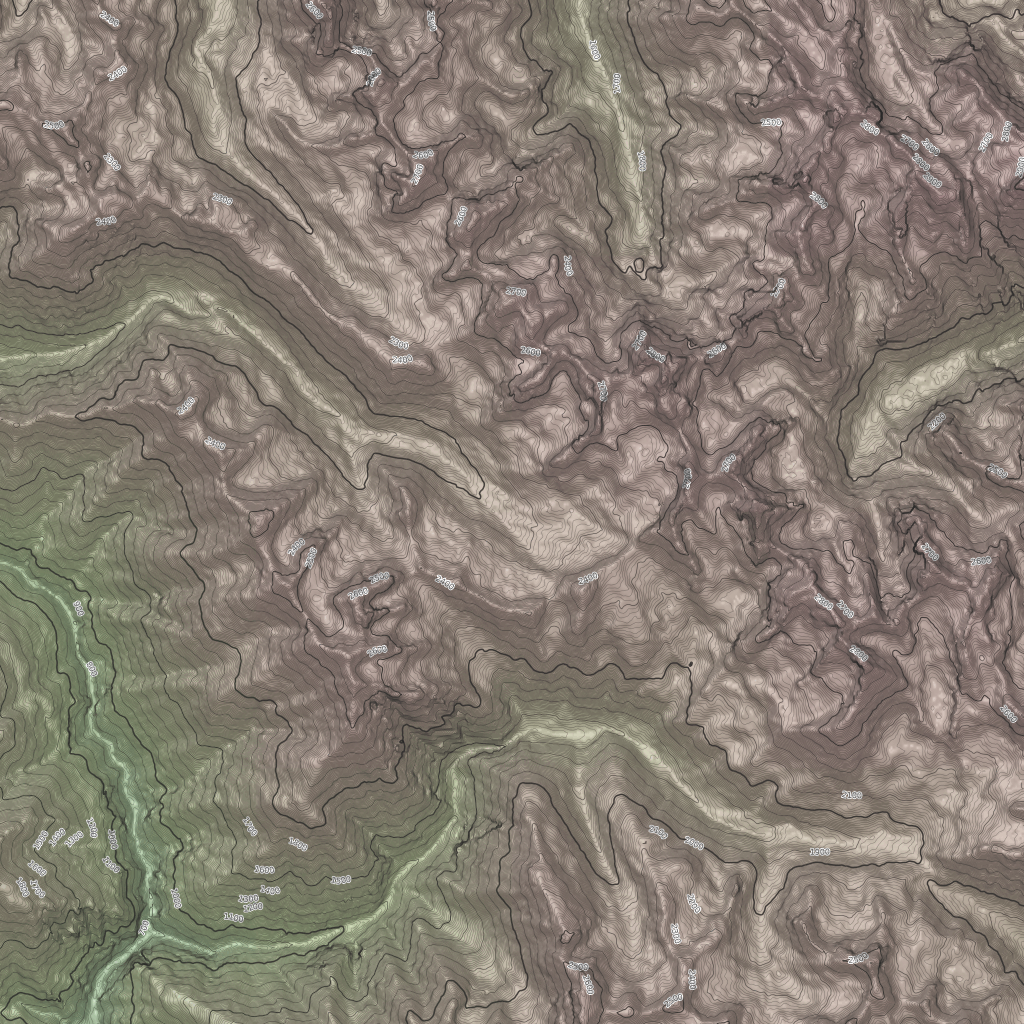
For contrast, check what 1arc means:

From my point of view, the quality is definitely better. Peaks, crests and valleys are quite sharp. As for the mountain sides, they look rugged. My appreciation is this reflects better the nature of the terrain in question, but Christoph Hormann of Imagico.de views it as sample noise. He has worked a lot on DEMs to generate very beautiful maps.
But then we have those nice blue lagoons courtesy of voids (the blue we can see is the water color I use in my maps). So, how to proceed?
The simplest way to fix this is covering the voids with averages calculated from the data at the seams of the voids. GDAL has a tool
for that called, of course, gdal_fillnodata.py. This is the outcome:
At first this looks quite good, but once we start to zoom in (remember there are at least 5 more zoom levels), we start to see some regular patterns:
Another option is to use deFerrantis' data to fill the voids. For this we need to merge both datasets. One way to do it is using
GDAL's gdalwarp tool. We create a file piling up layers of data; first the most complete one, then the layers with holes:
gdalwarp deFerrantis/N44E007.hgt mixed.tif
gdalwarp SRTM_1arc_v3/n44_e007_1arc_v3.tif mixed.tif
This looks like this:
I have to be honest, it doesn't look good. Both files declare the same extents and resolution (their metadata is similar, but the second file has more), but if you compare the renders for SRTM_1arc_v3 and deFerrantis, you will notice that they don't seem to align properly.
The last simple option would be to upsample SRTM_3arc_v4.1 and then merge like before, but it took me a while to figure out the right parameters:
gdalwarp -te 6.9998611 43.9998611 8.0001389 45.0001389 -tr 0.000277777777778 -0.000277777777778 -rb SRTM_3as_v4.1/srtm_38_04.tif srtm_1as_v3-3as_v4.1.tif
Creating output file that is 3601P x 3601L.
Processing input file SRTM_3as_v4.1/srtm_38_04.tif.
Using internal nodata values (eg. -32768) for image SRTM_3as_v4.1/srtm_38_04.tif.
0...10...20...30...40...50...60...70...80...90...100 - done.
gdalwarp SRTM_1as_v3/n44_e007_1arc_v3.tif srtm_1as_v3-3as_v4.1.tif
Processing input file SRTM_1as_v3/n44_e007_1arc_v3.tif.
Using internal nodata values (eg. -32767) for image SRTM_1as_v3/n44_e007_1arc_v3.tif.
0...10...20...30...40...50...60...70...80...90...100 - done.
The complex part was the -te and -tr parameters. The 3 arc file covers a 5x5 degrees zone at 40-45°N, 5-10°E.
The 1 arc file only covers 44-45°N, 7-8°E, so I need to cut it out. I use the -te option for that, but according the doc it's
«[to] set georeferenced extents of [the] output file to be created». This means the degrees of the W, S, E and N limits of the output
file. Note that the actual parameters are 1.5" off those limits; I took those limits from the original 1 arc file.
The second one is
even more cryptic: «[to] set [the] output file resolution (in target georeferenced units)». This last word is the key, units.
According to gdalinfo, both files have a certain pixel size in units declared in the projection. Both declare
UNIT["degree",0.0174532925199433]; “degree“ has a clear meaning; the float besides it is the size of the unit in radians (π/180).
So the parameters for -tr is how many units (degrees) does a pixel represent (or, more accurately, how many degrees are between
a pixel center and the next one). Notice that the vertical value is negative; that's because raster images go from North to South,
but degrees go the other way around (North and East degrees are positive, South and West negative). In any case, I also just copied
the pixel size declared in the 1 arc file.
After all this dissertation about GeoTIFF metadata, finally the resulting DEM:
As I said earlier, I don't have much time to invest in this; my map is mostly for personal consumption and I can't put much time on it. so my conclusion is this: if I can manage the 9x data size, I think I'm going this way.