JPEG tiles

I've been rendering my own maps for I don't remember how long. It's a raster style that prioritizes what's important to me, so when I open the map, it has all the info I want right there, no queries needed. It's also a mixed use map, with contrasting roads for driving aid, useful walking data (shops, paths, etc) and some other info that allows me to plan trips and vacations. I'm no cartographer, so most probably it can be seen as 'ugly' by many, but oh well, I'm no cartographer :)

But in fact the original reason I started doing my own maps was offline mode. Back then I had a Nokia N900 that had marble as the mapping app and a crappy 3G contract. It's a basic map app, but which can cache tiles and you can pre-fill that cache at will: just deploy the tiles in the right place and they will show when offline. The problem is, there are gazillion tiles and they weight a lot.

I currently serve all non-sea tiles2 from my own web server. We're talking about 24_058_696 files. A partial render of only about 500 thousand files shows each file uses a median of 15_414 bytes, so those 24M+ files should weight 370_840_740_144 bytes; that is, more than 345GiB (it's actually 282GiB; that's statistics for you :). This definitely does not fit in a puny smartphone (well, maybe, if I could put a huge, expensive and fragile SD card on my phone, which I can, hmmm). Anyways, it's still a lot. I could try and use one of the png file optimizers, but I have found very little gain there.

In another corner of my life, I watched a video of a photographer talking how playing with the JPEG quality slider in Photoshop could get great gains is disk space saved, specially if you pushed the slider all the way to 0, without really losing detail. So I took a picture, played with ImageMagick instead, to show him that Photoshop actually is lying to him, in the sense that its 0 value seemed to be closer to 70 or 80 in real JPEG parameters. I never wrote the response, but I still have the test images. So I picked them up, found that the one at 50 quality looked good enough, and used that value to save the tiles.

The result is very good. Almost all files are 50% or less their PNG size, and the peak is around 30%. That could mean I could use a smaller, more affordable 128GiB SD card. It also means that even if I don't put all the tiles on the phone, downloading them from my home server would be around 3x faster. Luckily Leaflet, OpenLayers and even marble (which I still use it to quickly browse my local cache) support the format. It's true, the quality is not perfect, but if I'm either driving or consulting the map while hiking, I'm not going to be really worried about the color of the white halos around text being a little tinted or other artifacts here an there, and I can always switch to the online, high quality maps if I have network access.

A couple of metatiles for comparison:

PNG:

JPEG:

That also means that now osm-tile-tools now accepts --tile-file-format which can be either PNG (the default) or JPEG. It also accepts a --tile-file-format-options option, to which you can pass format strings options as documented in mapnik's wiki1.


  1. I just started reading about PNG options and found I could use t=0 to remove the alpha channel that we don't use on tiles at all. That should give a gain, but it seems the format is clever enough to not include the channel if it's not used at all. Render times were similar. 

  2. as sea tiles are missing, I just serve a sea tile for any 404 code. This also means going somewhere that I haven't rendered yet gives you a nice blue wall. 

Trying to calculate proper shading

It all started with the following statement: "my renders are too slow". There were three issues as the root case: osm-carto had become more complex (nothing I can do there), my compute resources were too nimble (but upgrading them would cost money I don't want to spend in just one hobby) and the terrain rasters were being reprojected all the time.

My style uses three raster layers to provide a sense of relief: one providing height tints, one enhancing that color on slopes and desaturating it on valleys, and a last one providing hill shading. All three were derived from the same source DEM, which is projected in WGS 84 a.k.a. EPSG 4326. The style is of course in Pseudo/Web Mercator, a.k.a. EPSG 3857; hence the constant reprojection.

So my first reaction was: reproject first, then derive the raster layers. This single step made it all hell break loose.

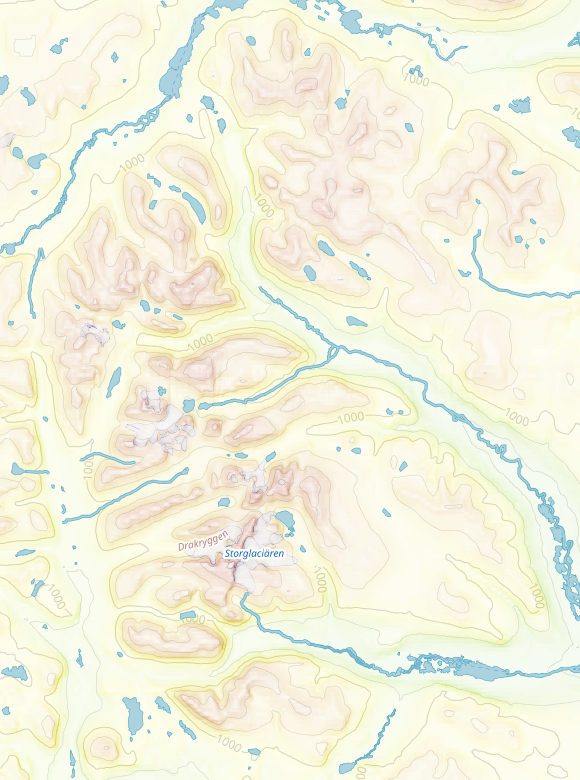
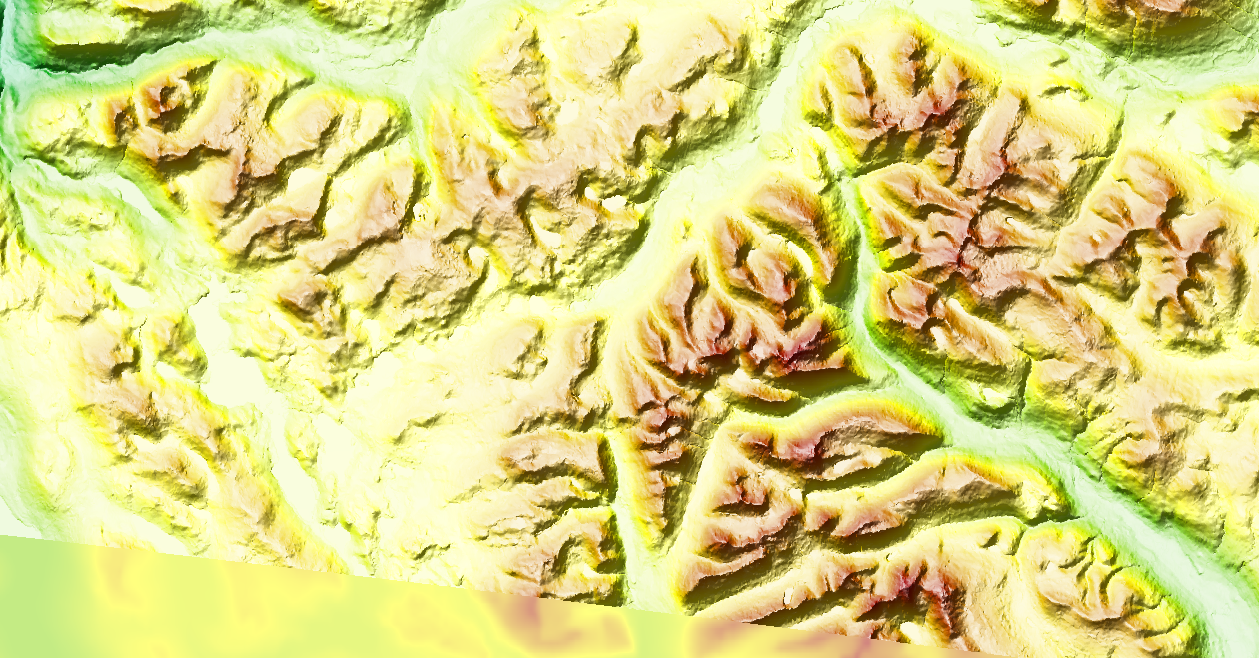
I usually render Europe. It's the region where I live and where I most travel to. I'm using relief layers because I like mountains, so I'm constantly checking how they look. And with this change, the mountains up North (initially was around North Scandinavia) looked all washed out:

The reason behind this is that GDAL's hill and slope shading algorithms don't take in account the projection, but just use pixel values as present in the dataset and the declared pixel size. The DEMs I'm using are of a resolution of 1 arc second per pixel. WGS84 assumes a ellipsoid of 6_378_137m of radius (plus a flattening parameter which we're going to ignore), which means a circumference at the Equator of:

In [1]: import math
In [2]: radius = 6_378_137  # in meters
In [3]: circunf = radius * 2 * math.pi  # 2πr
In [4]: circunf
Out[4]: 40_075_016.68557849  # in meters

One arc second is hence this 'wide':

In [5]: circunf / 360 / 60 / 60
Out[5]: 30.922080775909325  # in meters

In fact the DEMs advertises exactly that:

mdione@diablo:~/src/projects/osm/data/height/mapzen$ gdalinfo N79E014.hgt
Size is 3601, 3601
Coordinate System is:
GEOGCRS["WGS 84",
    DATUM["World Geodetic System 1984",
        ELLIPSOID["WGS 84",6378137,298.257223563,
            LENGTHUNIT["metre",1]]],
    PRIMEM["Greenwich",0,
        ANGLEUNIT["degree",0.0174532925199433]],
    CS[ellipsoidal,2],
        AXIS["geodetic latitude (Lat)",north,
            ORDER[1],
            ANGLEUNIT["degree",0.0174532925199433]],
        AXIS["geodetic longitude (Lon)",east,
            ORDER[2],
            ANGLEUNIT["degree",0.0174532925199433]],
    ID["EPSG",4326]]
Pixel Size = (0.000277777777778,-0.000277777777778)

Well, not exactly that, but we can derive it 'easily'. Deep down there, the declared unit is degree (ignore the metre in the datum; that's the unit for the numbers in the ELLIPSOID) and its size in radians (just in case you aren't satisfied with the amount of conversions involved, I guess). The projection declares degrees as the unit of the projection for both axis, and the pixel size is declared in the units of the projection, and 1 arc second is:

In [6]: 1 / 60 / 60  # or 1/3600
Out[6]: 0.0002777777777777778  # in degrees

which is exactly the value declared in the pixel size12. So one pixel is one arc second and one arc second is around 30m at the Equator.

The 'flatness' problem arises because all these projections assume all latitudes are of the same width; for them, a degree at the Equator is as 'wide' as one at 60°N, which is not; in reality, it's twice as wide, because the width of a degree decreases with the cosine of the latitude and math.cos(math.radians(60)) == 0.5. The mountains we saw in the first image are close to 68N; the cosine up there is:

In [7]: math.cos(math.radians(68))
Out[7]: 0.37460659341591196

So pixels up there are no longer around 30m wide, but only about 30 * 0.37 ≃ 11 # in meters!

How does this relate to the flatness? Well, like I said, GDAL's algorithms use the declared pixel size everywhere, so at f.i. 68°N it thinks the pixel is around 30m wide when it's only around 11m wide. They're miscalculating by a factor of almost 3! Also, the Mercator projection is famous for stretching not only in the East-West direction (longitude) but also in latitude, at the same pace, based on the inverse of the cosine of the latitude:

stretch_factor = 1 / math.cos(math.radians(lat))

So all the mountains up there 'look' to the algorithms as 3 times wider and 'taller' ('tall' here means in the latitude, N-S direction, not height AMSL), hence the washing out.

In that image we have an original mountain 10 units wide and 5 units tall; but gdal thinks it's 20 units wide, so it looks flat.

Then it hit me: it doesn't matter what projection you are using, unless you calculate slopes and hill shading on the sphere (or spheroid, but we all want to keep it simple, right? Otherwise we wouldn't be using WebMerc all over :), the numbers are going to be wrong.

The Wandering Cartographer mentions this and goes around the issue by doing two things: Always using DEMs where the units are meters, and always using a local projection that doesn't deform as much. He can do that because he produces small maps. He also concedes he is using the 111_120 constant when the unit is degrees. I'm not really sure about how that number is calculated, but I suspect that it has something to do with the flattening parameter, and also some level of rounding. It seems to have originated from gdaldem's manpage (search for the -s option). Let's try something:

In [8]: m_per_degree = circunf / 360
In [9]: m_per_degree
Out[9]: 111_319.49079327358  # in meters

That's how wide is a degree is at the Equator. Close enough, I guess.

But for us world-wide, or at least continent-wide webmappers like me, those suggestions are not enough; we can't choose a projection that doesn't deform because at those scales they all forcibly do, and we can't use a single scaling factor either.

gdal's algorithm uses the 8 neighboring pixels of a pixel to determine slope and aspect. The slope is calculated on a sum of those pixels' values divided by the cell size. We can't change the cell size that gdal uses, but we can change the values :) That's the third triangle up there: the algorithm assumes a size for the base that it's X times bigger than the real one, and we just make the triangle as many times taller. X is just 1 / math.cos(math.radians(lat)).

If we apply this technique at each DEM file individually, we have to chose a latitude for it. One option is to take the latitude at the center of the file. It would make your code from more complicated, specially if you're using bash or, worse, make because you have to pass a different value for -s, but you can always use a little bit of Python or any other high level, interpreted language.

But what happens at the seams where one tile meets another? Well, since each file has it's own latitude, two neighbouring values, one in one DEM file and the other in another, will have different compensation values. So, when you jump from a ~0.39 factor to a ~0.37 at the 68° of latitude, you start to notice it, and these are not the mountains more to the North that there are.

The next step would be to start cutting DEM tiles into smaller ones, so the 'jumps' in between are less noticeable... but can we make this more continuous-like? Yes we can! We simply compensate each pixel based on its latitude.

This image cheats a little; this one is based on EU-DEM and not mapzen like the original. You can see where the DEM file ends because the slope and hillshading effects stop at the bottom left. I still have to decide which dataset I will use; at some point I decided that EU-DEM is not global enough for me, and that it's probably better to use a single dataset (f.i. mapzen) than a more accurate but partial one, but since I usually render the regions I need, I might as well change my workflow to easily change the DEM dataset.

This approach works fine as shown, but has at least one limitation. The data type used in those TIFFs is Int16. This means signed ints 16 bits wide, which means values can go between -32768..32767. We could only compensate Everest up to less than 4 times, but luckily we don't have to; it would have to be at around 75° of latitude before the compensated value was bigger than the maximum the type can represent. But at around 84° we get a compensation of 10x and it only gets quickly worse from there:

75:  3.863
76:  4.133
77:  4.445
78:  4.809
79:  5.240
80:  5.758
81:  6.392
82:  7.185
83:  8.205
84:  9.566
85: 11.474
86: 14.336
87: 19.107
88: 28.654
89: 57.299  # we don't draw this far, the cutout value is around 85.5 IIRC
90:        # :)

The solution could be to use a floating point type, but that means all calculations would be more expensive, but definitely not as much as reprojecting on the fly. Or maybe we can use a bigger integer type. Both solutions would also use more disk space and require more memory. gdal currently supports band types of Byte, UInt16, Int16, UInt32, Int32, Float32, Float64, CInt16, CInt32, CFloat32 and CFloat64 for reading and writing.

Another thing is that it works fine and quick for datasets like SRTM and mapzen because I can compensate whole raster lines in one go as all its pixels have the same latitude, but for EU-DEM I have to compensate every pixel and it becomes slow. I could try to parallelize it (I bought a new computer which has 4x the CPUs I had before, and 4x the RAM too :), but I first have to figure out how to slowly write TIFFS; currently I have to hold the whole output TIFF in memory before dumping it into a file.

Here's the code for pixel per pixel processing; converting it to do row by row for f.i. mapzen makes you actually remove some code :)

#! /usr/bin/env python3

import sys
import math

import rasterio
import pyproj
import numpy

in_file = rasterio.open(sys.argv[^1])
band = in_file.read(1)  # yes, we assume only one band

out_file = rasterio.open(sys.argv[^2], 'w', driver='GTiff',
                         height=in_file.height, width=in_file.width,
                         count=1, dtype=in_file.dtypes[0],
                         crs=in_file.crs, transform=in_file.transform)
out_data = []

transformer = pyproj.Transformer.from_crs(in_file.crs, 'epsg:4326')

# scan every line in the input
for row in range(in_file.height):
    if (row % 10) == 0:
        print(f"{row}/{in_file.height}")

    line = band[row]

    # EU-DEM does not provide 'nice' 1x1 rectangular tiles,
    # they use a specific projection that become 'arcs' in anything 'rectangular'

    # so, pixel by pixel
    for col in range(in_file.width):
        # rasterio does not say where do the coords returned fall in the pixel
        # but at 30m tops, we don't care
        y, x = in_file.xy(row, col)

        # convert back to latlon
        lat, _ = transformer.transform(y, x)

        # calculate a compensation value based on lat
        # real widths are pixel_size * cos(lat), we compensate by the inverse of that
        coef = 1 / math.cos(math.radians(lat))

        line[col] *= coef

    out_data.append(line)

# save in a new file.
out_file.write(numpy.asarray(out_data, in_file.dtypes[^0]), 1)

That's it!


  1. Except for the negative value. That has to do with the fact that pixels count from top to bottom, but degrees from South (negative) to North. 

  2. The other number, 0.0174532925199433, is how much a degree is in radians. 

  3. All that extra math is converting degrees into radians so cos() is happy. 

CentOS7 systemd not booting on LXD or docker containers on Ubuntu Impish

A few days after it came out, I upgraded from (K)Ubuntu 21.04 to 21.10. Yes, I am such a junkie.

It all seemed fine, at least desktop-wise, until I had to run some tests for the thing I develop at $WORK. See, we use VM-like containers on top of both Docker and LXD. The images that these build upon are some variation of CentOS7.x be cause that's what we use as our product's OS. When I say VM-like, I mean that inside runs a mostly full OS from systemd and up, not just a single process, which is at least what Docker recommends. If you didn't guessed from the title, the issue was that the containers were not booting properly.

To complicate things, we actually have a quite deep stack, which we try to keep as stable as possible. On top of it all, we have a Pyhon+bash layer that allows us to describe things in terms of our product. Right below this we have Terraform, and to talk to LXD we have, of course, terraform-provider-lxd. LXD itself seems to be a mix of a CLI, an API server, and maybe LXC underneath? And since there are no more proper .debs anymore, you can only install it through snap, which also adds a layer of complexity. This means two things: pinning to a version is not automatically possible because versions disappear from the snap repositories, meaning that deploying new runner nodes becomes impossible once this happens; and debugging can be difficult because the images that contain the software lack some tools like strace. Honestly, we started pinning because lxd-4.10 broke something for us; sorry, I can't remember what.

And then you have an old and deprecated OS like CentOS7, to which we have to stick to because upgading it to newer major versions is impossible; the only supported option is "reinstall". We know very well: we spent oh-so-many man hours coming up with a script for automating the 6->7 upgrade, and yes, we should be facing the migration to 8 right now, but since what happened with CentOS post-8, we're even thinking of jumping ships. But I digress.

My first reaction was: LXD must have changed. But of course it didn't, snap obediently followed the order of staying on 4.9. Next thing in my head was: it's a kernel issue. Unluckily I had purged the old kernels, so I had to download them from repos and install them, all by hand. It didn't matter: 21.10 refused to properly boot with it. In fact the system boots, but for some reason Xorg and the wifi were not working, so this meant my laptop became not only mostly useless, but also unfixable due to the lack of internet to find causes and solutions.

The most annoying thing was that, from the way I was experiencing it, it mostly seemed like terraform-provider-lxd couldn't properly talk to LXD: the provider was creating network resources fine, but container resources didn't finish. Checking with lxc5 I could see the containers coming up, but it was like the provider didn't see them there. It was not clear if it couldn't talk to LXD or something else6.

I spent some time trying to debug that, but as I said, neither LXD nor that provider have changed. Decoupling the provider from terraform was impossible, so I was mostly debugging through two or three layers, which feels like driving a car by giving instructions like "press the gas pedal1" to another person by telephone. And then there's the issue of snap images not having tools, so at most you can only count on the server's own debuggability wich, in the case of LXD, for the API part it seems fine, but the "I'm creating containers" part was frankly inexistant. I really needed to see why the containers were behaving differently now because I got to the point were I was sure cloud-init was not running, and realizing that not even systemd was running on them.

So, how can we debug this? LXD is not that hard, but then you have the extra layer of snap. For that, you will have to use these spells:

$ sudo snap stop lxd
$ sudo snap run --shell lxd
# cd $SNAP
# ./commands/lxd --debug

But the fact is, you won't get more information than if you run the client with --debug, because it seems not to log any info about creating the containers themselves.

As for systemd, it's harder to debug because it can't assume there's anything there to support the logs, so your only options are either a console like device or its own internal journal. In this particular case I tried the journal, but when I was running journalctl to see any messages, it complained about not finding any log files and that the journal was empty. So, I used kmsg2:

CMD=[ "/usr/sbin/init", "--log-level=debug", "--log-target=kmsg" ]

(I'm cheating here, because this is when I was trying to use our other tool, the one based on docker, but it's good because it allowed me to provide those options. I'm not sure how to do the same with LXD).

This gave us the first glimpse to a solution:

[448984.949949] systemd[1]: Mounting cgroup to /sys/fs/cgroup/cpuset of type cgroup with options cpuset.
[448984.949963] systemd[1]: Failed to mount cgroup at /sys/fs/cgroup/cpuset: No such file or directory

systemd is complainig about some cgroup files missing. But checking my mount points I can clearly see the cgroup2 filesystem3 mounted:

cgroup2 on /sys/fs/cgroup type cgroup2 (rw,nosuid,nodev,noexec,relatime)

But systemd is right, those files are not there:

17:29 $ ls -l /sys/fs/cgroup/
-r--r--r--   1 root root 0 Oct 22 15:43 cgroup.controllers
-rw-r--r--   1 root root 0 Oct 22 15:43 cgroup.max.depth
-rw-r--r--   1 root root 0 Oct 22 15:43 cgroup.max.descendants
-rw-r--r--   1 root root 0 Nov  4 12:21 cgroup.procs
-r--r--r--   1 root root 0 Oct 22 15:43 cgroup.stat
-rw-r--r--   1 root root 0 Nov  4 12:21 cgroup.subtree_control
-rw-r--r--   1 root root 0 Oct 22 15:43 cgroup.threads
-rw-r--r--   1 root root 0 Oct 22 15:43 cpu.pressure
-r--r--r--   1 root root 0 Oct 22 15:43 cpuset.cpus.effective
-r--r--r--   1 root root 0 Oct 22 15:43 cpuset.mems.effective
-r--r--r--   1 root root 0 Oct 22 15:43 cpu.stat
drwxr-xr-x   2 root root 0 Oct 22 15:43 dev-hugepages.mount
drwxr-xr-x   2 root root 0 Oct 22 15:43 dev-mqueue.mount
drwxr-xr-x   2 root root 0 Oct 22 16:04 init.scope
-rw-r--r--   1 root root 0 Oct 22 15:43 io.cost.model
-rw-r--r--   1 root root 0 Oct 22 15:43 io.cost.qos
-rw-r--r--   1 root root 0 Oct 22 15:43 io.pressure
-r--r--r--   1 root root 0 Oct 22 15:43 io.stat
drwxr-xr-x   2 root root 0 Oct 22 16:08 lxc.pivot
-r--r--r--   1 root root 0 Oct 22 15:43 memory.numa_stat
-rw-r--r--   1 root root 0 Oct 22 15:43 memory.pressure
-r--r--r--   1 root root 0 Oct 22 15:43 memory.stat
-r--r--r--   1 root root 0 Oct 22 15:43 misc.capacity
drwxr-xr-x   2 root root 0 Oct 22 16:04 -.mount
drwxr-xr-x   2 root root 0 Oct 22 15:43 proc-fs-nfsd.mount
drwxr-xr-x   2 root root 0 Oct 22 15:43 proc-sys-fs-binfmt_misc.mount
drwxr-xr-x   2 root root 0 Oct 22 15:43 sys-fs-fuse-connections.mount
drwxr-xr-x   2 root root 0 Oct 22 15:43 sys-kernel-config.mount
drwxr-xr-x   2 root root 0 Oct 22 15:43 sys-kernel-debug.mount
drwxr-xr-x   2 root root 0 Nov  3 13:21 sys-kernel-debug-tracing.mount
drwxr-xr-x   2 root root 0 Oct 22 15:43 sys-kernel-tracing.mount
drwxr-xr-x 154 root root 0 Nov  8 17:27 system.slice
drwxr-xr-x   3 root root 0 Oct 22 15:43 user.slice

"Maybe [an] incompaible kernel?" I asked my coleague. He suggested some options, but they were no longer relevant for the kernel version I was running. The next day (yes, this was a multi day endeavor!) I noticed our CI runners had different cgroups:

mdione@uk-sjohnson:~$ ls -l /sys/fs/cgroup/
dr-xr-xr-x 17 root root  0 Oct 28 23:24 blkio
lrwxrwxrwx  1 root root 11 Oct 28 23:24 cpu -> cpu,cpuacct
lrwxrwxrwx  1 root root 11 Oct 28 23:24 cpuacct -> cpu,cpuacct
dr-xr-xr-x 17 root root  0 Oct 28 23:24 cpu,cpuacct
dr-xr-xr-x  6 root root  0 Oct 28 23:24 cpuset
dr-xr-xr-x 17 root root  0 Oct 28 23:24 devices
dr-xr-xr-x  7 root root  0 Oct 28 23:24 freezer
dr-xr-xr-x  6 root root  0 Oct 28 23:24 hugetlb
dr-xr-xr-x 17 root root  0 Oct 28 23:24 memory
lrwxrwxrwx  1 root root 16 Oct 28 23:24 net_cls -> net_cls,net_prio
dr-xr-xr-x  6 root root  0 Oct 28 23:24 net_cls,net_prio
lrwxrwxrwx  1 root root 16 Oct 28 23:24 net_prio -> net_cls,net_prio
dr-xr-xr-x  6 root root  0 Oct 28 23:24 perf_event
dr-xr-xr-x 17 root root  0 Oct 28 23:24 pids
dr-xr-xr-x  5 root root  0 Oct 28 23:24 rdma
dr-xr-xr-x 17 root root  0 Oct 28 23:24 systemd
dr-xr-xr-x 16 root root  0 Nov  4 13:50 unified

I checked the mount poins in both systems and they both mentioned the same cgroup2 filesystem, but looking again revealed the problem:

cgroup2 on /sys/fs/cgroup/unified type cgroup2 (rw,nosuid,nodev,noexec,relatime)
cgroup on /sys/fs/cgroup/systemd type cgroup (rw,nosuid,nodev,noexec,relatime,xattr,release_agent=/usr/lib/systemd/systemd-cgroups-agent,name=systemd)
cgroup on /sys/fs/cgroup/net_cls,net_prio type cgroup (rw,nosuid,nodev,noexec,relatime,net_cls,net_prio)
cgroup on /sys/fs/cgroup/freezer type cgroup (rw,nosuid,nodev,noexec,relatime,freezer)
cgroup on /sys/fs/cgroup/cpu,cpuacct type cgroup (rw,nosuid,nodev,noexec,relatime,cpu,cpuacct)
cgroup on /sys/fs/cgroup/hugetlb type cgroup (rw,nosuid,nodev,noexec,relatime,hugetlb)
cgroup on /sys/fs/cgroup/pids type cgroup (rw,nosuid,nodev,noexec,relatime,pids)
cgroup on /sys/fs/cgroup/rdma type cgroup (rw,nosuid,nodev,noexec,relatime,rdma)
cgroup on /sys/fs/cgroup/cpuset type cgroup (rw,nosuid,nodev,noexec,relatime,cpuset,clone_children)
cgroup on /sys/fs/cgroup/devices type cgroup (rw,nosuid,nodev,noexec,relatime,devices)
cgroup on /sys/fs/cgroup/memory type cgroup (rw,nosuid,nodev,noexec,relatime,memory)
cgroup on /sys/fs/cgroup/blkio type cgroup (rw,nosuid,nodev,noexec,relatime,blkio)
cgroup on /sys/fs/cgroup/perf_event type cgroup (rw,nosuid,nodev,noexec,relatime,perf_event)

21.10 is mounting cgroup2 but not any of the cgroup (v1) filesystems we could see in 20.04 (LTS) Like just above. It took me a while, but I found it in the release notes4:

systemd is being switched to the “unified” cgroup hierarchy (cgroup v2) by default. If for some reason you need to keep the legacy cgroup v1 hierarchy, you can select it via a kernel parameter at boot time: systemd.unified_cgroup_hierarchy=0

Which is exactly what my coleague suggested me. After one reboot, and some fixes due to having upgraded most of our stack, both our LXD and docker based tools were booting old CentOS7´s systemd without a hitch.


  1. I wonder what we'll call it when and if most cars are electric. 

  2. Interestingly, systemd-245's manpage I have in my brand new machine running KDE Neon has almost circular references for some options:

    --log-target= Set log target. See systemd.log_target above.

    systemd.log_target= Controls log output, with the same effect as the $SYSTEMD_LOG_TARGET

    SYSTEMD_LOG_TARGET systemd reads the log target from this environment variable. This can be overridden with --log-target=. 

  3. There's some foreshadowing here. Notice the difference between cgroup and cgroup2

  4. It's a shame that Ubuntu decided to move from their wiki to discourse for presenting this info: discourse does not provide a way to link to a section of the release notes, while the wiki does

  5. One can only wonder why they decided to call the CLI tool with the same name of the underlying tech; that is, LXD vs lxc vs lxc-*, which is what LXC's CLI tools are called. 

  6. I think the problem is that network interfaces are not configured, and maybe the provider tries to connect to them? 

LXD certificate verification failure

Yesterday I upgraded my work machine to Ubuntu 21.10. Wrong move.

I run test systems on LXD. For compat reasons, we stopped at version 4.9. But this version stopped working with the new 5.13 kernel. The symptom was that few commands really finished exeuting. I tried using the old 5.11 kernel, but the system didn't even finish booting (it stayed waiting for a wireguard service that would never succeed because the underlaying network was not connected yet).

So next I tried upgrading the LXD conector (because we really use terraform), then upgrading LXD itself (and hoping our issues were fixed), but still no cigar.

So I went full nuclear, purged LXD and reinstalled. Not my preferred way to solve things, but I was already wasting a full day on this. This seemed to show some progress, but then I started getting this error in terraform (which actually comes from the provider):

lxd_network.singlenode: Refreshing state... [id=singlenode]
Error: Unable to create client for remote [localhost]: 
  Get "https://127.0.0.1:5555/1.0": 
      x509: certificate signed by unknown authority (possibly because of 
            "x509: ECDSA verification failure" while trying to verify candidate 
                   authority certificate "root@nimbus")

(I wrapped the line a little so it's more readable).

Ok, certificate issue, even when accept_remote_certificate = true was configured on the provider. The weird part was that f.i. lxd list was working fine. I run lxd remote and it was not showing localhost, so I tried lxc remote add nimbus 127.0.0.1:5555 --accept-certificate --password=xxxxx but I was still getting the same error!

Then a coworker reminded me: you have to remove ~/.config/lxc/servercerts/remote.crt so it forgets about it and gets a new one.

Now I have issues that might be related to the new LXD provider for terraform, but at least LXD is working fine again.

Rendering isolated amenities vs dense regions

For a while I have been maintaining a slight fork of osm-carto. I changed a few things here and there so I can use the map for several types of activities, including driving. For that I set important highways (motorway to secondary) so they stand out more using dark colors, but I also wanted to be able to spot things that can be critical, like pharmacies, fuel stations and hospitals. Not far from where I live there is a very mountainous regions with a few small towns where not always there are these amenities.

The problem arises when you have to make a balance between a few icons on a sparse region and too many icons on a very dense one. Initially I started by adding smaller icons (10px instead of the usual 14px) and my first tests looked OK even on the most dense part of this region. But I had forgotten to check against really dense parts, like the biggest cities in Europe.

Long story short: The map becomes not only useless (too many icons) but also really ugly.

This is not the first time I try to do this, and back in January I got a glimpse of a possibility: I read in the weekly news about wikimap, which shows dots in a map for every geo-tagged wikipedia article. What got my attention is that the developer was using aggregated icons, so instead of showing a lot of them packed tightly, he's shown a big icon with a count of aggregated locations.

So I contacted him and asked him how he did it. He linked me to the code, but warned me that the post processing was really slow. Because of that I never really tried it.

But today, after looking at packed clusters of icons in cities like İstanbul, I decided to give it a go. The good part is that because I only need this for just a couple of amenities that can be concentrated enough to make the map ugly: pharmacies and fuel stations. Another advantage is that, unlike wikimap, I only need this for a single zoom level; the idea is to map those amenities in sparsely populated zones, assuming that in dense zones they should be common enough. So here's my first attempt:

CREATE MATERIALIZED VIEW IF NOT EXISTS density AS
    SELECT
        a.osm_id,
        (SELECT
            count(b)
        FROM
            planet_osm_point AS b
        WHERE
            ST_DWithin(a.way, b.way, 10000)
        AND a.amenity = b.amenity
        AND a.osm_id != b.osm_id) AS density
FROM
    planet_osm_point AS a
WHERE
    a.amenity = 'pharmacy';

We take a target (a.way) and we find all the similar objects within a radius (10k EPSG:3857 meters, which is not actual meters except at the Equator) and not counting itself. Then we use a cutout value to decide to render the node or not:

[feature = 'amenity_pharmacy'][zoom >= 11][density < 15],
[feature = 'amenity_pharmacy'][zoom >= 14] {

Looking at the resulting data I found an interesting tidbit: Madrid has probably the higher pharmacy density in the world. Many nodes there have more than 1500 neighboring peers in a 10km radius!

This was not good enough. Initially I though the reason was that, instead of density, I should look at minimum distance, replacing count(b) with min(ST_Distance(b.way, a.way) and calling the table isolation, and define a different cutout value. The problem with that one is that if you have a two or more pharmacies close to one another but otherwise isolated, I want to draw those. Instead, I reduced the radius to 3km and played with the cutout value until I was satisfied.

A disadvantage of this approach is that now you have two values to play with, the radius and the cutout value, while the other one has only one. Not only that, every time you want to test a new radius value, you have to run an expensive query. For Europe, in my puny rig (10yo CPU, 8GiB of RAM, a consumer SSD on SATA) it can take around 30m, which is not specially expensive once you got the value you're happy with. Of course, I run my tests in smaller extracts.

Also, I don't run an up-to-date database, I simply reimport from time to time. If I did, the data in the materialized view (it's like a table, but remembers how it was calculated, and can be refreshed) would slowly become out-of-date, but one could live with that and run the refreshes, say, once a week.

Lastly, this mostly works for me because I have just a few 'popular' tags that I render so early (ZL11); for a generic map like OSM's default it would probably be way more expensive. Wikimap's developer told me that "it takes about 10 hours for the set of geotagged articles from the English Wikipedia."

Finally, some screen shots:

Before:

After:

And, if you followed the link about Madrid, this is how it looks after.

Stacking photos with Python

Last month we went on vacations to a place with medium light pollution. It was also meteor shower season; the Perseids were peaking that week. So I decided to try some astro-photography. I bought a cheap barn door tracker, but it didn't arrive before we left, so I had to change my plans of taking Milky Way pictures.

I went for the other extreme; instead of steady stars, why not star trails? Luckily, my Nikon D7200 already has Interval Timer Shooting, so it was only a matter of setting it up correctly1 and let it take as many pictures as long as it still has power. You can say that was the easy part. The hard part was to do the stacking.

The way you stack star trail photos is that you combine them in Lighten mode. Ihad already used that technique to produce this photo Gimp can do it, if you load all the images as layers and then set each layer by hand with a lighten mode. The by hand part is the hard part. My first attempt gave me only 58 photos, so it was not that bad, but the repetitiveness of the task (select a layer, change the mode, iterate, a mouse only operation) asked for automation. Unluckily there is not a good way to generate a file that gimp can load with all that info prefilled; its native format, XCF, is binary, and embeds all the images, so 58x12Mpx4 channels equals 2784MB! Plus metadata... The second attempt yielded 250+ photos. Stacking that one was tedious, and the outcome (because of some technical reasons) was not that great.

Why not programmatically? I asked around what good Python modules that could do composition operation and I was pointed to GTK, but the API didn't look very friendly (to me it looks like it's more aimed to implement things like Inscape than GIMP). I looked for a second time and found BlendModes. That lead to a short script, but it was slow, and consumed lots of RAM. I didn't look into the code, but it's probably implemented in pure Python and might be doing some things wrong.

Third time's the charm: I found Image Blender. It's written in Cython, so it's mostly readable and fast, at least fast enough. I simply modified the original code and got this:

#! /usr/bin/python3

import sys
from PIL import Image
import image_blender

in_files = sys.argv[1:-1]
out_file = sys.argv[-1]
count = len(in_files)

out_data = None

for index, in_file in enumerate(in_files):
    print(f"[{index+1}/{count}] {in_file}")
    in_image = Image.open(in_file).convert(mode='RGBA')

    if out_data is None:
        out_data = Image.new('RGBA', in_image.size)

    new_out = Image.frombytes('RGBA', in_image.size, image_blender.lighten(out_data.tobytes(), in_image.tobytes()))

    in_image.close()
    out_data.close()

    out_data = new_out

out_data.convert('RGB').save(out_file)

Not pretty, but it does the work and fast enough! Faster than selecting 250+ layers in GIMP just to change the Mode :)


  1. I made myself a checklist, not complete:

    • Make sure the battery is full; use spare if needed.
    • Setup tripod with ballast for stability.
    • Large photo size (12Mp in my case).
    • Fine detail (I don't shoot RAW, don't have much time and expertise for developing photos, so low JPEG compression level).
    • No noise reduction.
    • VR off.
    • ISO between 400 and 1600; I think I took most with 800.
    • Manual Shooting Mode, 30s exposure2:, f as wide as possible; I used f/11.
    • Manual Focus.
    • Focus aiming at the brightest star, lens' zoom at peak (140mm in my case), then open back at the desired focal length, recompose.

  2. I wonder why all the cameras I have only allow exposures of up to 30s before going into bulb mode? 

SQLAlchemy: failed to locate name could not determine join condition

There used to be a time where I used SQLAlchemy a lot. Then life took a turn and its use was left inside the bowels of barely maintained code. It kept on working, no matter how many times my distro updated it. That's good; good technology is the one you don't hear about anymore.

A few months back I wanted to add to my photo filtering app support for reading and writing the digikam database. I already use digikam for mass tagging and face recognition, and I wanted to add tagging to my filtering workflow. Remembering the good experience with SQLA in the past, I decided to use it again.

Initially I just loaded three tables: AlbumRoots, Albums and Images. The relationship between them is simple, because Albums are always relative to its (Album)Root, so there is no parent relationship there. Because I didn't like plurals or redundancy in my class names, I decided to call the classes Root, Album and Image. Then came the 'hardest' part, which is tags.

For tags I just needed two more tables: Tags and ImageTags. The former is obvious, except that this one has a parent relationship, so tags can be nested. The latter is just a join table with one column pointing to Tags and the other pointing to Images.

Having no primary key on that table means we can't use SQLA's ORM on it. And this is the first new thing1 I learned about SQLA. You can have Mapper classes that provide the full ORM experience, and you can have simpler Table instances (notice the difference here) that just declare tables that you might need to use otherwise, which is our case here. So I called my class Tag and the table instance is ImageTags. This is because I'm more interested in the Tags for an Image than the Images for a Tag.

I want my code to be as consistent as possible. If there are two or more ways to do one thing, I chose one and use it all over the code. So when SQLA can refer to tables and columns (the lowercase here is intentional) either by instance or as a string, I prefer instances. But I also wanted to have the declaration of the tags attribute for Image in the class' definition itself (see below), and because of a chicken-egg situation (Image needs ImageTags declared, and ImageTags needs Image declared), I decided to convert them all to strings.

Here's the resulting code:

ImageTags = Table(
    'ImageTags', metadata,
    Column('imageid', Integer, ForeignKey('Image.id'), nullable=False, index=True),
    Column('tagid', Integer, ForeignKey('Tag.id'), nullable=False, index=True),
    UniqueConstraint('imageid', 'tagid')
)


class Tag(Base):
    __tablename__ = 'Tags'
    __table_args__ = (
        UniqueConstraint('name', 'pid'),
    )

    id = Column(Integer, primary_key=True)
    pid = Column(Integer)
    # TODO: define parent
    name = Column(Text, nullable=False)
    icon = Column(Integer)
    iconkde = Column(Text)


class Image(Base):
    __tablename__ = 'Images'
    __table_args__ = (
        UniqueConstraint('album', 'name'),
    )

    id = Column(Integer, primary_key=True)
    album = Column(Integer, index=True)
    name = Column(Text, nullable=False, index=True)
    status = Column(Integer, nullable=False)
    category = Column(Integer, nullable=False)
    # modification_date = Column('modificationDate', DateTime)
    modification_date = Column('modificationDate', Text)
    file_size = Column('fileSize', Integer)
    hash = Column('uniqueHash', Text, index=True)
    tags = relationship('Tag', secondary='ImageTags')

This doesn't work. Can you figure out why? No? Let me give you a hint:

When initializing mapper mapped class Image->Images, expression 'ImageTags' failed to
locate a name ("name 'ImageTags' is not defined"). If this is a class name, consider
adding this relationship() to the <class 'digikam.Image'> class after both dependent
classes have been defined.

I have to say, this really baffled me. Of course, again, it's been a long time since I used SQLA in any serious setting, and the documentation is huge and sprawling. Reading it all over again looked like too much just for a simple situation that is well described. To me, failed to locate a name meant it couldn't find the name in the module. "But it's right there!", I shouted.

So this is the second thing I learned about SQLA. When you use a string for referencing a table or column (lower case intentional, again), you need to refer to the database names. And because few examples actually have different class/attribute vs table/fields names, it's hard to figure it out, and because I'm renaming heavily, I got stuck. So the simple fix is replacing 'ImageTags' by ImageTags.

And that's when I get the next error:

Could not determine join condition between parent/child tables on relationship
Image.tags - there are no foreign keys linking these tables via secondary table
'ImageTags'. Ensure that referencing columns are associated with a ForeignKey or
ForeignKeyConstraint, or specify 'primaryjoin' and 'secondaryjoin' expressions.

And again the same shout: "But it's right there!" But again, my ForeignKeys are using strings, so of course it has to be the database names and not the instances names. Instead, I declared ImageTags after Image and put instances instead of strings for consistency. The price to pay? Now I have to declare the relationship outside the class, and the same will happen for the parent attribute in Tag (see TODO :). The final code:

class Tag(Base):
    __tablename__ = 'Tags'
    __table_args__ = (
        UniqueConstraint('name', 'pid'),
    )

    id = Column(Integer, primary_key=True)
    pid = Column(Integer)
    # TODO: define parent
    name = Column(Text, nullable=False)
    icon = Column(Integer)
    iconkde = Column(Text)


class Image(Base):
    __tablename__ = 'Images'
    __table_args__ = (
        UniqueConstraint('album', 'name'),
    )

    id = Column(Integer, primary_key=True)
    album = Column(Integer, index=True)
    name = Column(Text, nullable=False, index=True)
    status = Column(Integer, nullable=False)
    category = Column(Integer, nullable=False)
    # modification_date = Column('modificationDate', DateTime)
    modification_date = Column('modificationDate', Text)
    file_size = Column('fileSize', Integer)
    hash = Column('uniqueHash', Text, index=True)
    # see below
    # tags = Relationship('Tag', secondary='t_ImageTags')


ImageTags = Table(
    'ImageTags', metadata,
    Column('imageid', Integer, ForeignKey(Image.id), nullable=False, index=True),
    Column('tagid', Integer, ForeignKey(Tag.id), nullable=False, index=True),
    UniqueConstraint('imageid', 'tagid')
)

Image.tags = Relationship('Tag', secondary=ImageTags)

  1. When I say "new", I mean "new to me". This could also mean "Once I knew, but I forgot, so this new to me now" :) 

Python box: dict/object duality

At work I massage a lot of JSON and YAML data. One of the annoyances of this is that all imported data is handled as dicts, so you end up with things horrible to type like:

virt_data['cluster']['ssh-authorized-keys'] = data['cluster'].get('ssh-authorized-keys', [])

Lots of strings and dict indexing. Wouldn't if be nicer to write it as:

virt_data.cluster.ssh_authorized_keys = data.cluster.get('ssh-authorized-keys', [])

After a while, it feels better.

So, like any Python developer who likes to play with these things, I tried to write a class that would implement object attribute access and dict indexing at the same time. The latter should allow for using as input for yaml.dump() and json.dump() transparently.

I wrote 110 lines of heavily tested code. All went fine until I found a bug in __deepcopy__() that meant to, once more, do recursion in case of lists or other dicts. To be honest, I have a lot of work load right now, and I didn't have the energy to factor out this recursing code from other methods.

Meanwhile, a few weeks ago I saw a new package in Debian called python-box, which promised implementing exactly that. I wrote a note about testing it and moved on. This looked like the right moment to do exactly that.

Long story short, it worked perfectly. I replaced most of my class with box.Box by inheriting from it, I kept the only method I had that didn't come from dict, and it worked almost as expected. The only difference was that Box tries to keep attribute access and dict indexing completely separated. Let me explain.

In the example above, you'll see that ['ssh-authorized-keys'] was replaced by .ssh_authorized_keys. The change from - to _ is needed because identifiers (including attribute names) can't have -s. The dict/object duality also means that you can access elements with the getattr() function and the .get() method. What python-box does, which I wasn't in my original class, is to only allow the _ variant with getattr(), and only the - variant with get(). I think I changed two lines of code, including one test, and all was fine. ´ So, in conclusion, if you ever want and/or need object/dict duality, go for python-box. It has a decent release cadence, not many open issues, cdgriffith seems to answer promptly. Be sure of checking out its limitations before using it.

Bus routes with osm2pgsql flex backend

10 days ago Joachim Topf commited the new flex backend into osm2pgsql. This new backend gives you full control on what data goes where, and the opportunity to massage it a little bit before committing to the db. This is useful not only because we could move processing from the rendering time to the import time (which, let's be honest, we could already do some with the --tag-transform-script option), but also because we can move away from the 4 table setting of the original osm2pgsql mode (line, point, polygons, roads) and also ignore data we don't want in the db or even create new one.

This new backend works exactly like osm2pgsql. There are two stages; the first one goes through all the nodes, ways and relations (in that order), and the second one only through ways and relations. For each one of these types you can define a function, process_[type](). process_node() is only going to be called in stage 1, but process_way() and process_relation() are going to be called in both stages. The functions, of course, can figure out in which stage they are; my advise is to split the functions into process_node_stage1() and process_node_stage2() and call them from process_node() to make that more clear. An object is processed in stage 2 only if it was marked in stage 1. For more details, please read the docs, and definitely learn lua.

My first task for this is bus routes. Last time I put some of my few spare time on my fork I managed to display bus routes but it was ugly: overlapping dash based lines that were difficult to follow.

Compare that to a real map of a (quite small) bus network, and you get the idea that my take wasn't going to be useful.

Let's try to think how this can be achieved. What we need is a way to take each way and count how many bus lines are going through it. Bus lines are represented as relations, of which we can take the members. So the first step must be to find all the members of a relation. This can be done in process_relation_stage1(). We mark all the ways in a bus relation, and we also somehow associate the bus to the way.

In stage 2, we process all the marked ways (ways with buses), we count how many buses go through it, we create a new way for rendering each bus line, and we displace this new line based on which 'slot' it belongs to, so the lines are parallel.

I have a first version of such algorithm. It's based on one of the examples. Let's take it apart:

local tables = {}

tables.routes = osm2pgsql.define_way_table('routes', {
    { column = 'tags',   type = 'hstore' },
    { column = 'offset', type = 'float' },
    { column = 'ref',    type = 'text' },
    { column = 'colour', type = 'text' },
    { column = 'way',    type = 'linestring' },
})

We declare a table that will store ways, called routes. It will store the original tags of the way in hstore format, plus an offset column, that will tell the renderer how much to displace the line, plus a ref and a colour; and of course, the way itself.

pt_ways = {}

function osm2pgsql.process_relation(relation)
    -- Only interested in relations with type=route, route=bus and a ref
    -- TODO: other pt routes too
    if relation.tags.type == 'route' and relation.tags.route == 'bus' and relation.tags.ref then
        for _, member in ipairs(relation.members) do
            if member.type == 'w' then
                -- print(relation.id, member.ref, relation.tags.ref)
                if not pt_ways[member.ref] then
                    pt_ways[member.ref] = {}
                end

                -- insert() is the new append()
                table.insert(pt_ways[member.ref], relation)
                osm2pgsql.mark_way(member.ref)
            end
        end
    end
end

We process the relations. Like I said before, we take all the members that are ways, we store this bus line in an array indexed by the original way id, and we mark the way for processing in stage 2. Notice the the bus line's ref is in the tags.ref indexes (more on this later), while it's id is in the ref index. This last part was confusing to me.

function sort_by_ref(a, b)
    return a.tags.ref < b.tags.ref
end

function osm2pgsql.process_way(way)
    -- Do nothing for ways in stage1, it'll be in relations where the magic starts
    if osm2pgsql.stage == 1 then
        return
    end

    -- We are now in stage2
    local routes = pt_ways[way.id]
    table.sort(routes, sort_by_ref)

We do nothing for ways in stage 1, and in stage 2 we sort the routes to give them a consistent ordering when rendering consecutive ways.

    local line_width = 2.5
    local offset = 0
    local side = 1
    local base_offset
    local offset
    local index
    local ref
    local slot
    local shift

    if #routes % 2 == 0 then
        base_offset = line_width / 2
        shift = 1
    else
        base_offset = 0
        shift = 0
    end

    for index, route in ipairs(routes) do
        -- index is 1 based!
        slot = math.floor((index - shift) / 2)
        offset = (base_offset + slot * line_width) * side

        if side == 1 then
            side = -1
        else
            side = 1
        end

This is the part of the algo that calculates the offset. It was refined after a couple of iterations and it seems to work fine with odd and even amount of bus lines. line_width will be moved to the style later, so I can apply widths depending on ZL. In short, we're assigning slots from the center to the outside, alternating sides.

        -- TODO: group by colour
        -- TODO: generic line if no colour
        row = {
            tags = way.tags,
            ref = route.tags.ref,
            colour = route.tags.colour,
            offset = offset,
            geom = { create = 'line' }
        }

        tables.routes.add_row(tables.routes, row)
    end
end

And this is the end. We set the row values and add it to our table. It's that simple :) Now we run osm2pgsql with the flex backend:

$ osm2pgsql --cache 1024 --number-processes 4 --verbose --create --database mc --output=flex --style bus-routes.lua --slim --flat-nodes nodes.cache --hstore --multi-geometry --drop
osm2pgsql version 1.2.0 (1.2.0-248-gba17b0c) (64 bit id space)
Reading in file: monaco-latest.osm.pbf
Processing: Node(46k 0.4k/s) Way(3k 3.78k/s) Relation(10 10.00/s)  parse time: 125s
Node stats: total(46745), max(7199027992) in 124s
Way stats: total(3777), max(770935077) in 1s
Relation stats: total(215), max(10691624) in 0s
Entering stage 2...
Creating id indexes...
Creating id index on table 'routes'...
Creating id indexes took 0 seconds
Lua program uses 0 MBytes
Entering stage 2 processing of 458 ways...
Entering stage 2 processing of 0 relations...
Clustering table 'routes' by geometry...
Using native order for clustering
Creating geometry index on table 'routes'...
Analyzing table 'routes'...
All postprocessing on table 'routes' done in 0s.
Osm2pgsql took 129s overall

Now, for the render part, it's twofold; a layer definition...:

SELECT
    way,
    COALESCE(colour, 'purple') as color,
    ref as route,
    "offset"
FROM routes
ORDER BY ref

... and the style itself:

#routes {
  [zoom >= 14] {
    line-width: 1;
    line-color: @transportation-icon;
    line-join: round;
    line-offset: [offset];
    [zoom >= 17] {
      line-color: [color];
      line-width: 2;
    }
  }
}

Quite simple too! That's because all the data is already prepared for rendering. All the magic happens at import time. Here's the same region as before:

Now, two caveats: This last thing means that if you want to change the style, you most probably will need to reimport the data. It must have taken me some 20 iterations until I got the data in a way I could use for rendering, that's why I tested with an extract of Monaco :) I also used a separate db from the main render database, but maybe just another table would be enough.

Second, you have to specify all the data you want to save, there is no compatibility with the current rendering database, so you will also need to base your code on the compatible example. In my tests, I just imported the data the usual way:

$ osm2pgsql --cache 1024 --number-processes 4 --verbose --create --database mc --output=flex --style bus-routes.lua --slim --flat-nodes nodes.cache --hstore --multi-geometry --drop
osm2pgsql version 1.2.0 (1.2.0-248-gba17b0c) (64 bit id space)
Mid: loading persistent node cache from nodes.cache
Setting up table: planet_osm_nodes
Setting up table: planet_osm_ways
Setting up table: planet_osm_rels
Using lua based tag processing pipeline with script openstreetmap-carto.lua
Setting up table: planet_osm_point
Setting up table: planet_osm_line
Setting up table: planet_osm_polygon
Setting up table: planet_osm_roads
Reading in file: monaco-latest.osm.pbf
Processing: Node(46k 0.8k/s) Way(3k 3.78k/s) Relation(210 105.00/s)  parse time: 61s
Node stats: total(46745), max(7199027992) in 58s
Way stats: total(3777), max(770935077) in 1s
Relation stats: total(215), max(10691624) in 2s
Stopping table: planet_osm_nodes
Stopped table: planet_osm_nodes in 0s
Stopping table: planet_osm_ways
Stopped table: planet_osm_ways in 0s
Stopping table: planet_osm_rels
Stopped table: planet_osm_rels in 0s
Sorting data and creating indexes for planet_osm_point
Sorting data and creating indexes for planet_osm_roads
Sorting data and creating indexes for planet_osm_polygon
Sorting data and creating indexes for planet_osm_line
Using native order for clustering
Copying planet_osm_point to cluster by geometry finished
Creating geometry index on planet_osm_point
Creating indexes on planet_osm_point finished
Copying planet_osm_roads to cluster by geometry finished
Creating geometry index on planet_osm_roads
Creating indexes on planet_osm_roads finished
All indexes on planet_osm_point created in 0s
Completed planet_osm_point
All indexes on planet_osm_roads created in 0s
Completed planet_osm_roads
Copying planet_osm_polygon to cluster by geometry finished
Creating geometry index on planet_osm_polygon
Creating indexes on planet_osm_polygon finished
All indexes on planet_osm_polygon created in 0s
Completed planet_osm_polygon
Copying planet_osm_line to cluster by geometry finished
Creating geometry index on planet_osm_line
Creating indexes on planet_osm_line finished
All indexes on planet_osm_line created in 0s
Completed planet_osm_line
Osm2pgsql took 64s overall

One thing to notice is that it took half of the time of the flex backend.

Append only files cannot be removed

Today I spent 4 hours in this shit, so I better write this down: append only files (chattr +a) cannot be rm'ed, not even by root. Four hours later and one chattr -a later, I got rid of it. Goddamit.